


Start typing in the search bar to see suggestions.
Use monday.com to track on-site attendance
Update: there is now a direct link to monday.com, you can still use Make but you can also achieve the same result using the native connector.
monday.com is an exceptional tool. The Work OS, as they define themselves, can be used to manage a wide range of office tasks.
Our team uses it daily to follow up on projects, planning, and tasks. We love the fun and modern interface of monday.com, and we couldn’t go back.
But monday.com is a framework that can be extended for various businesses. Coupled with the Ubiqod platform from Skiply, it can become a simple yet powerful tool for on-site attendance tracking.
Let’s put ourselves in the shoes of a cleaning company manager who wants to make real time time tracking of on-site work with monday.com.
What we want to achieve: track attendance on site with QR codes and connected devices
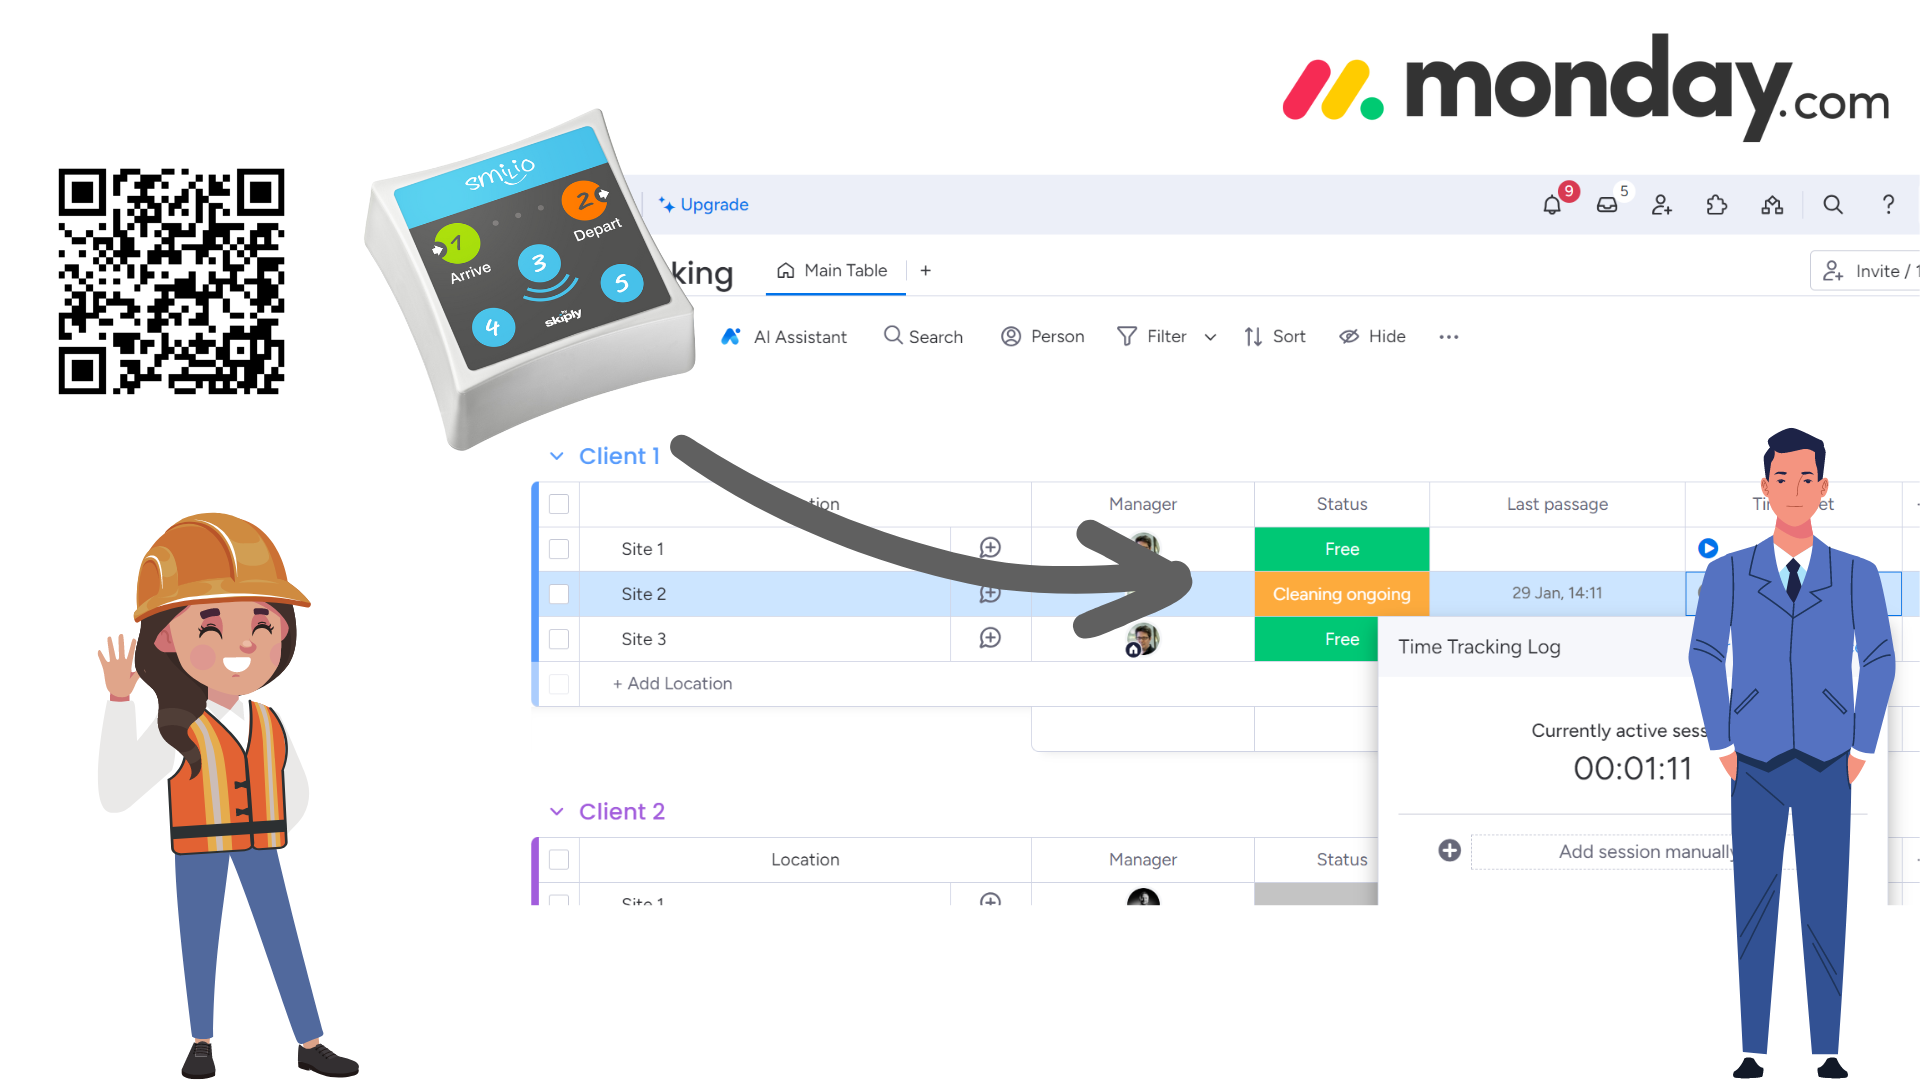
Supervise on-site work in real time
We wil create one monday.com item per location to track.
Each time that a field worker is detected on site, the status will switch to “Cleaning ongoing”. The last passage column will be updated automatically and the Time Tracking Log will start.
When the worker is out, the Status will come back to “Free”, and the Time Tracking Log will stop.
The supervision screen will look like this:
We can organise contracts and clients with boards and groups, but you are free to adapt it to your need.
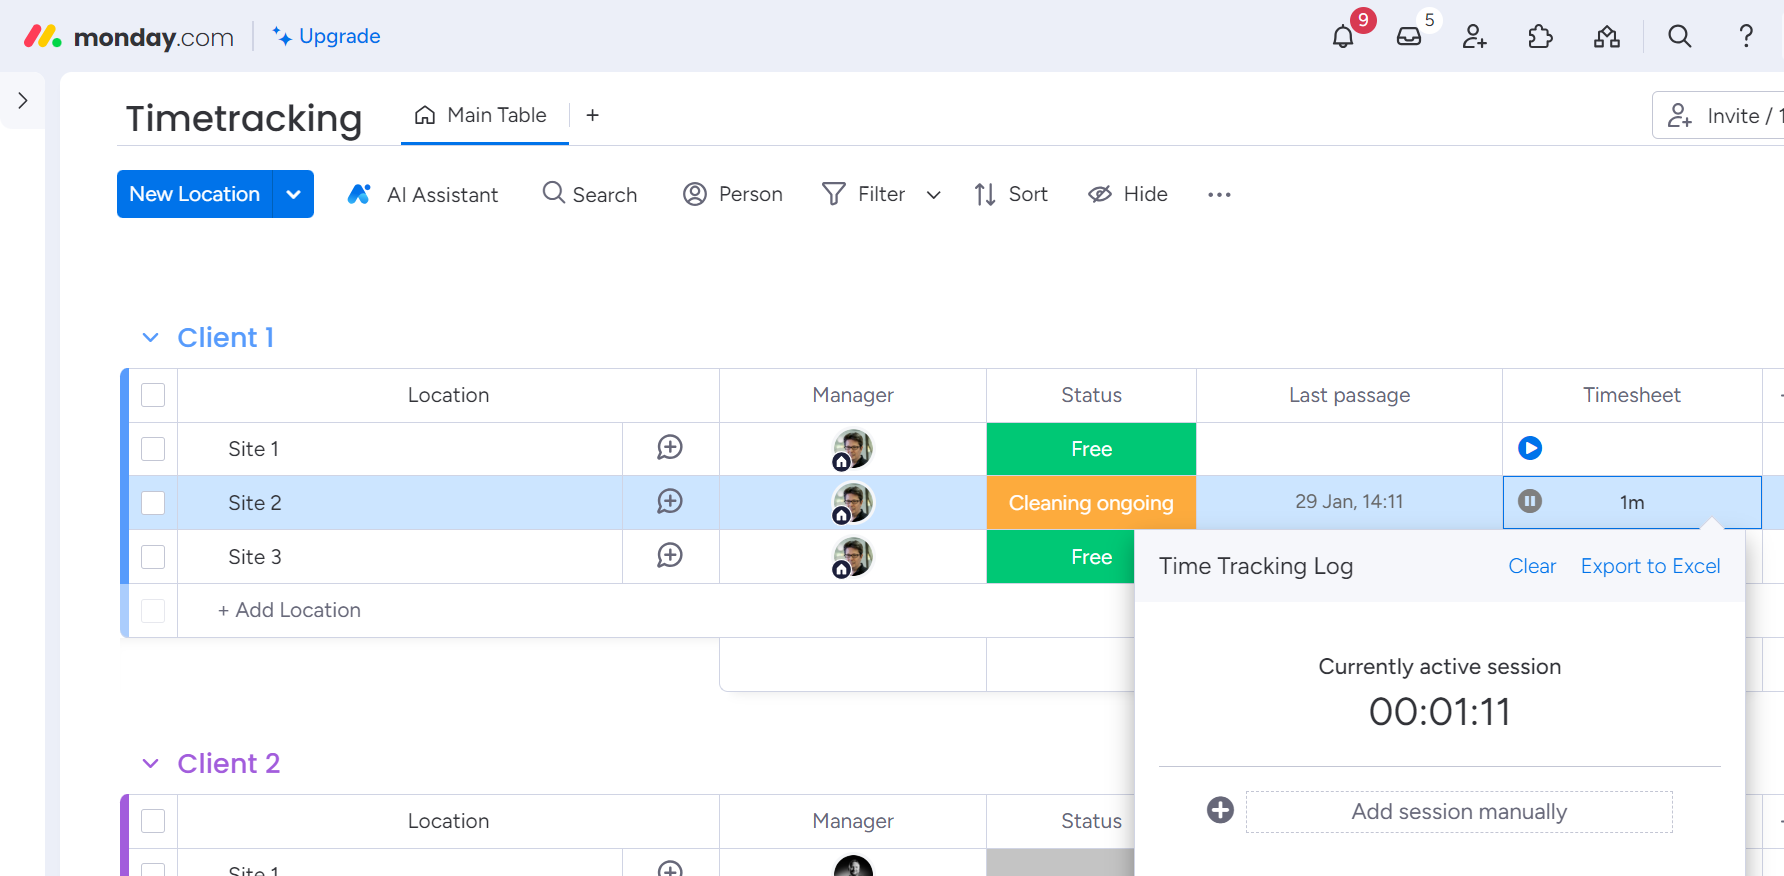
Keep track of attendance
Thanks to the integrated Time Tracking Log column, we will be able to keep track of attendance and share it with the customer. The person in charge could be added in the logs with additional work, but let’s start with something simple to begin.
About the trackers
The purpose of this tutorial is not to cover the different possibilities to track attendance with Ubiqod. For this particular use case, you can use the connected buttons Smilio A, Ubiqod Key or standard QR codes.
A short overview of the process
In order to achieve our goal, we will combine the superpowers of 3 tools:
– Ubiqod, to create QR codes and IoT interfaces to interact with the real world (100 free credits available)
– Make.com to implement the business logic without writing a single line of code
– monday.com to manage the locations and supervise the work
Configuring monday.com
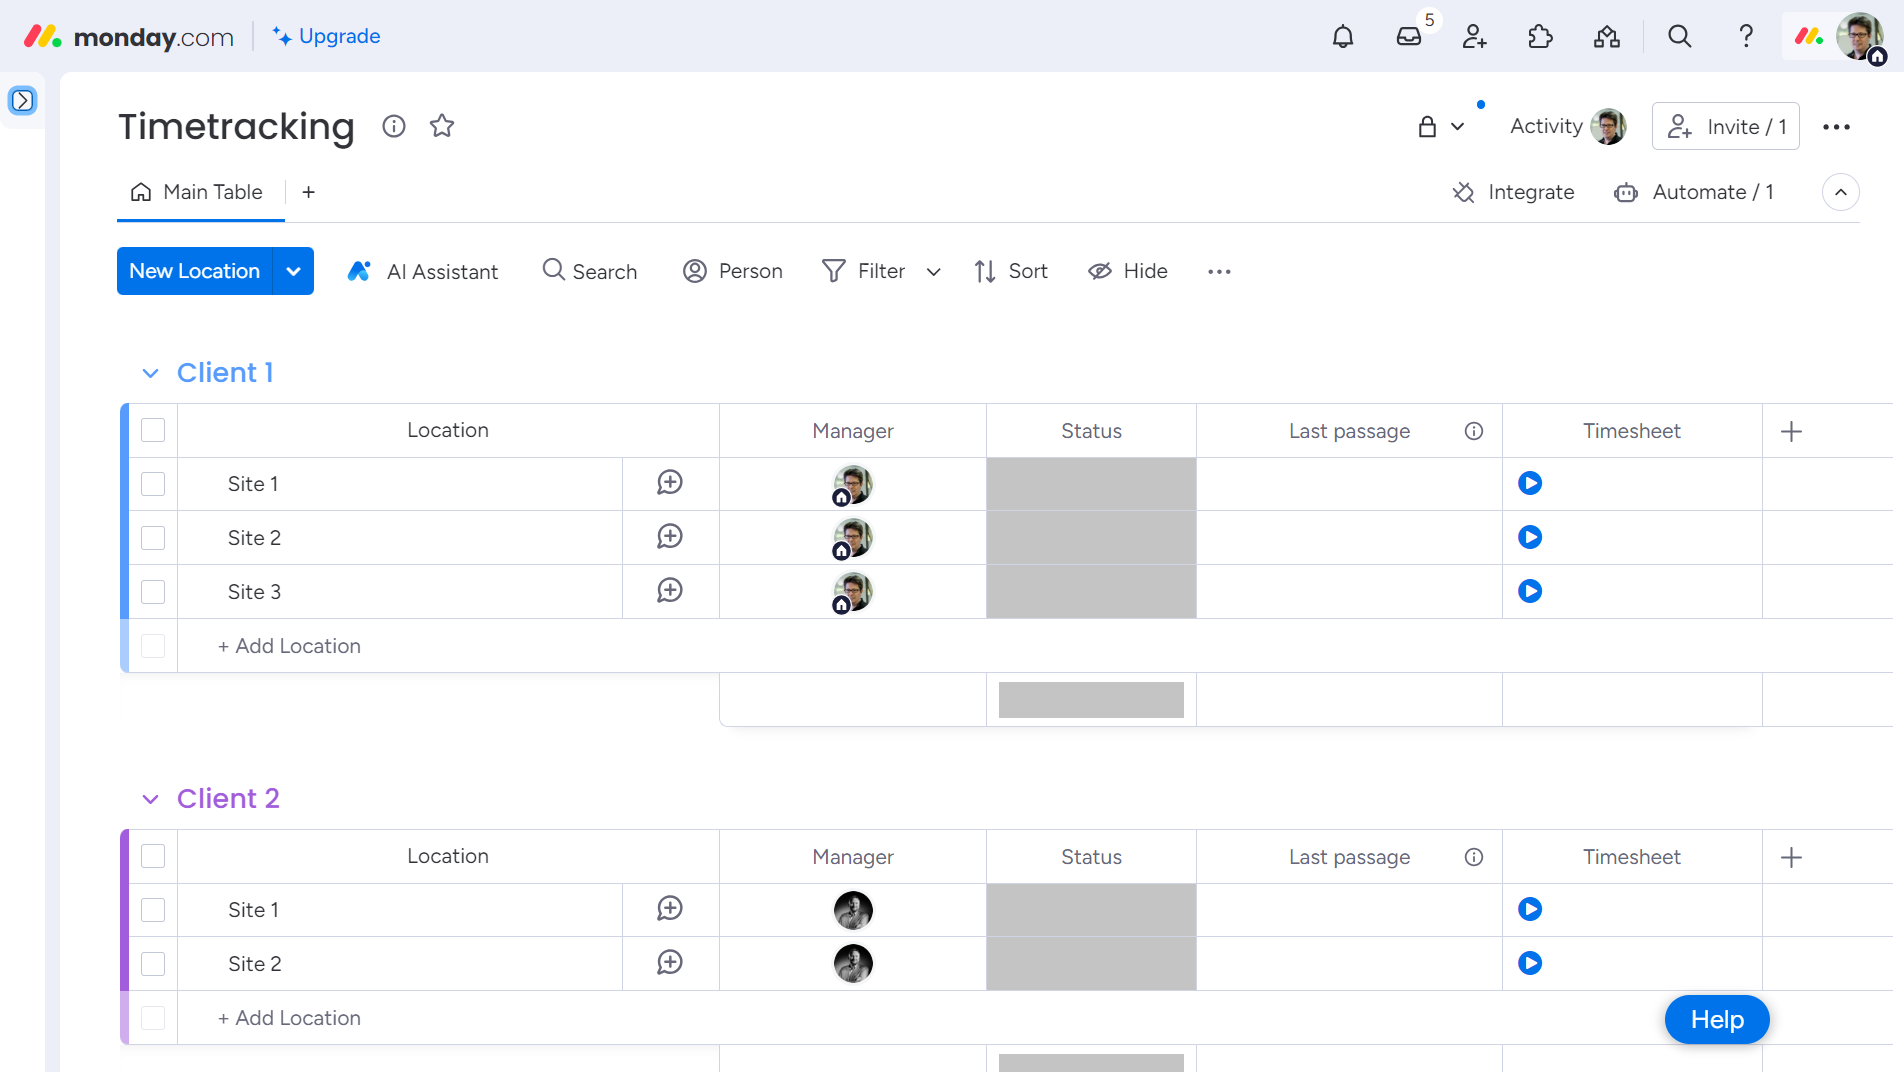
Configuring our board for on-site activity tracking
The first step is to create a monday.com board that can act as a supervision tool even without being connected with Ubiqod.
Let’s start with something like this:
If you are not familiar with monday.com you can start to learn here.
Each item will represent a location / site to clean.
We will setup 3 status in the status column:
– The green status will be labelled “Free”
– The orange status will be labelled “Cleaning ongoing”
– The red status will be called “Late”
The last passage column is a date type column, and you should add the time in the column options.
The timesheet is a Time Tracking Log column type.
Adding automations
monday.com has impressive automation features that we will use to make our life easier.
We will implement 3 automations:
– When the status changes to Cleaning ongoing, we will start the Timesheet clock AND update the last passage column (don’t forget to add time)
– When the status changes to Free, we will stop the Timesheet clock
At the end, your automation screen should look like this:

Testing our new location board
Before going a step ahead with real world connection, you can check that your board behaves as expected. Change the status to “Cleaning ongoing” and wait a couple of seconds: you should see the Last passage column update and the Timesheet should start. Then, switch to the status “Free”: Timesheet clock should stop.
Now that we ensured that our monday.com board works as expected manually, we will connect it to our field workers with Ubiqod.
Configuring the business logic with Make.com
In order to connect Ubiqod to monday.com, we will use Make.com. If you are not familiar with this tool, you can start here.
Here is the process that we need to implement:
– A webhook will catch data from Ubiqod. Each time that a field worker will be detected or will scan a QR code, this will trigger our scenario
– The router will check if the user arrives on site or is leaving
You can use this blueprint and import it into Make.com to spare time. You will have to reconfigure your Webhook and the monday.com board id in order to make it work.
At the end, the scenario should look like this:
![]()
Save and activate the scenario.
Configuring the worker interfaces with Ubiqod
Creating our sites
Creating sites in Ubiqod is easy. In our case, we need only one additional step: make a link between a monday.com item and a site / location.
First we have to find the monday.com item number of a site/location (see the highlighted number in the URL):

Then, we need to add it to our site in the External References List, using the custom key: monday-site-id (this is the one we used in Make.com).

That’s all for the sites.
Notice: you can mass import sites into Ubiqod to spare time in the production phase. Please check the full documentation to know more.
Creating our interface
You can connect monday.com with any Ubiqod compatible device: Ubiqod Key, Clock S, Smilio A… In order to keep it simple for this tutorial, we will use the standard QR code as proof of attendance.
You can create a single choice interface like this one:

Ensure that Arrive has the reference 1 and Depart has the reference 2 in order to make the blueprint work in Make.com.
Creating our dispatch
Copy the webhook url given by Make.com:

Create a webhook dispatch and enter the URL given by Make.com in Ubiqod:

A native Make.com App will be soon available, so you won’t need to use Webhooks anymore!
Creating our QR codes
Now, you can create a QR code tracker with the interface, site and dispatch created earlier:

Adding new locations will now be very fast and simple: you can use the mass creation / importing functions.
Test and play!
Now you can scan the QR code and simulate the arrival/departure of a worker on site.
If you need assistance, please comment this LinkedIn Post.
With monday.com, you can improve the system in many different ways:
– Add a daily check to mark services as “Late”
– Add the information about the person in charge
– Create a new choice in the interface to request additional services
Enjoy!