Start typing in the search bar to see suggestions.
How to turn a smartphone into a time clock kiosk?
Thanks to the Ubiqod platform, you have the possibility to turn any smartphone into a time clock for your employees and contractors.
This tutorial was created with:
– An old Redmi Go smartphone under 100 EUR equipped with Android 8 (for your information, the latest Android version at the time of writing this tutorial is 14)
– The company’s Wi-Fi (no SIM card needed, but it’s also possible to use 3/4/5G)
– QR code badges generated by the Ubiqod platform
How does it work?
Once configured, our smartphone can be used in 2 setups:
– A wall-mounted time clock connected permanently to the power supply and available for self-service by the teams
– A mobile time clock used, for example, by a security guard to scan the QR code badges of people
Configuring Ubiqod
Create the time clock user interface
To transform our smartphone into a time clock, 3 steps are essential at the Ubiqod interface level:
– It’s necessary to configure at least the 2 Arrival and Departure buttons (additional functions like break management can be added).
– Identification by Scan must be activated, and the front camera should be used (the rear camera will be against the wall).
After a successful clock-in, the system must automatically return to the start screen so that the next people can clock in.
Here is an example of an interface configuration adapted to our use case:
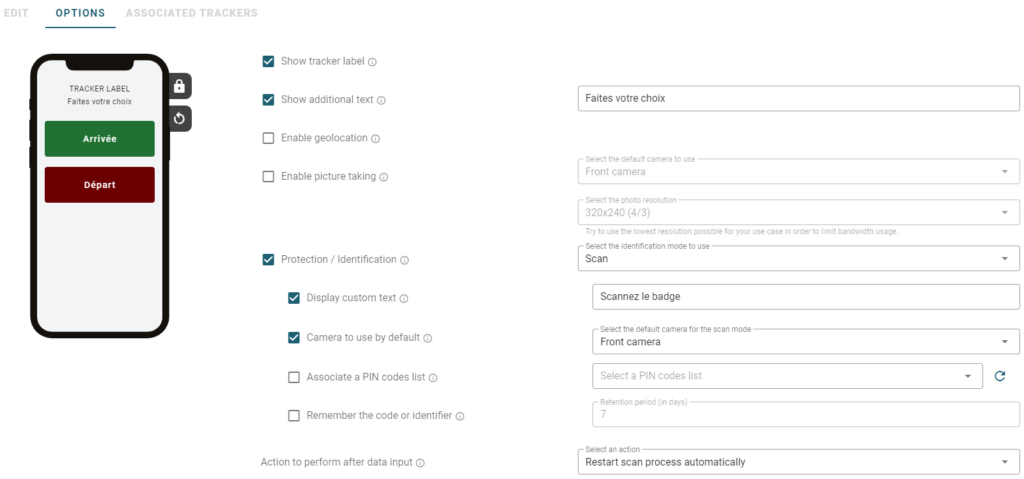
Optionally, you can activate geolocation functions.
For more information on configuring interfaces in Ubiqod, consult the documentation.
Create a tracker (one per smartphone)
Each smartphone must correspond to a tracker in Ubiqod. A tracker corresponds to an “interaction point” with the user. This tracker can be located and referenced. In our case, we will use a QR code type tracker (QOD), which we will associate with the previously created interface.
For more information on configuring trackers in Ubiqod, consult the documentation.
Configure the smartphone
Our goal is for the smartphone, when turned on, to directly display the home screen in the browser. To do this, we will “lock” it on Google Chrome, which will directly display the page of our tracker. If your smartphone uses a different browser or operating system than Android, you will need to adapt these instructions accordingly. There are also many apps in the Play Store or App Store to put the smartphone in Kiosk mode.
Scan the tracker’s QR code
Use the smartphone’s camera or a dedicated app to scan the QR code and access the home page you configured in the interface.
Configure Google Chrome
Set the time clock page as the home page of Google Chrome (in the settings menu).
Pin Google Chrome
Android includes a function to “pin” an App. When this function is activated, the smartphone is locked on this application, and it’s necessary to enter the smartphone’s PIN code to exit.
Depending on your version of Android, consult the adapted procedure here.
Generate the QR code badges
Ubiqod allows you to generate identification QR codes at no cost. For this, consult the documentation related to PIN code lists.
Define where the data should be sent
To test your new time clock, you can use the connector to Google Sheets or the Skiply Timesheet app. You can then route the data to the application of your choice using the built-in connectors on the platform.
Test your new mobile time clock
When you clock in for the first time, Chrome will ask for permissions: access to the camera to scan the QR code, and geolocation if you have activated this option. During the next clock-ins, these permissions will be remembered (unless you opened Chrome in private mode, which is not recommended for this use case).