Start typing in the search bar to see suggestions.
monday.com QR code tracking
monday.com is a great tool to manage projects. By adding QR code tracking features, you can transform it into an even better field activity tracking tool.
With the Ubiqod connector for monday.com, you can update a status column, a text column, a URL column, and even geolocation columns… This can be done by your suppliers, workers or even customers.
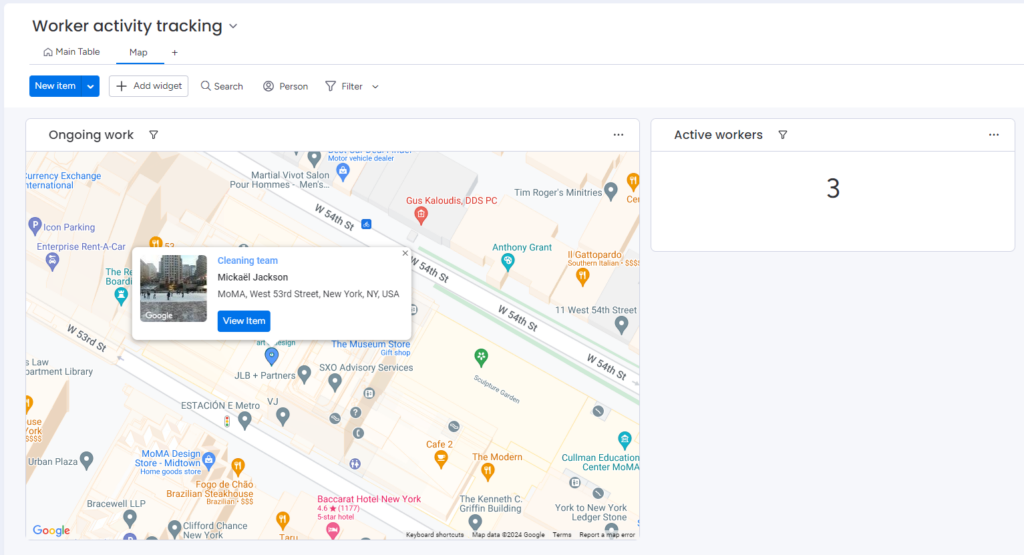
In this tutorial, we will be able to locate the member of the cleaning team in real time accross NYC (you can apply the same method if you need to update a status instead):
If you only need to generate a link to your monday.com item in the monday.com mobile App, you can read this documentation (free feature).
What can you do with monday.com QR Code Tracking?
Combining the monday.com dispatch and the monday.com App for Ubiqod, you can associate a QR code to each item in the Work OS. You can generate the associated QR code in the Ubiqod interface, or directly in a column in your monday.com board (for instance when you create an item).
The QR code will use a Ubiqod interface to update the associated monday.com item. That means that this QR code will be usable by any third party not having access to your board, including customers, sub-suppliers or workers in a factory.
You can also use the tracker link to generate a NFC tag for each item, see NFC clocking example.
There are many use cases around this, including following examples:
– Tracking activity on a customer site (for instance for a cleaning or maintenance company)
– Track the status of an item during the manufacturing process
– Update the status of a renting car
– Update the stock level of an item with a digit interface
– Geolocate an employee at client sites or facility (this tutorial)
How to link Ubiqod and monday.com?
Send data from trackers (QR codes, NFC or IoT) to monday.com in Ubiqod
Create an interface
Depending on the use case you want to implement in monday.com, you will have to create the corresponding interface in Ubiqod. As an example, we will implement a people geolocation tracker that will send the GPS position of the user and update it accordingly into monday.com.
Create an single choice interface, with a button, “Update my position” and activate geolocation:
![]()
Here are some examples of interfaces that can be used for monday.com QR code tracking:
– Digit to update remaining items in stock
– Single Choice Arrival / Departure for cleaning services follow up on site (similar to clocking with monday.com, without the need to use Make)
– Single Choice status to update the status column of a monday.com item
Create a dispatch
In the dispatch section of Ubiqod, create a monday.com dispatch. Each tracker associate with this dispatch will send data to monday.com in real time.
You need to create a monday.com connection (or select one if already done), select a board, and the column to update.
At the end, your dispatch page should look like this:
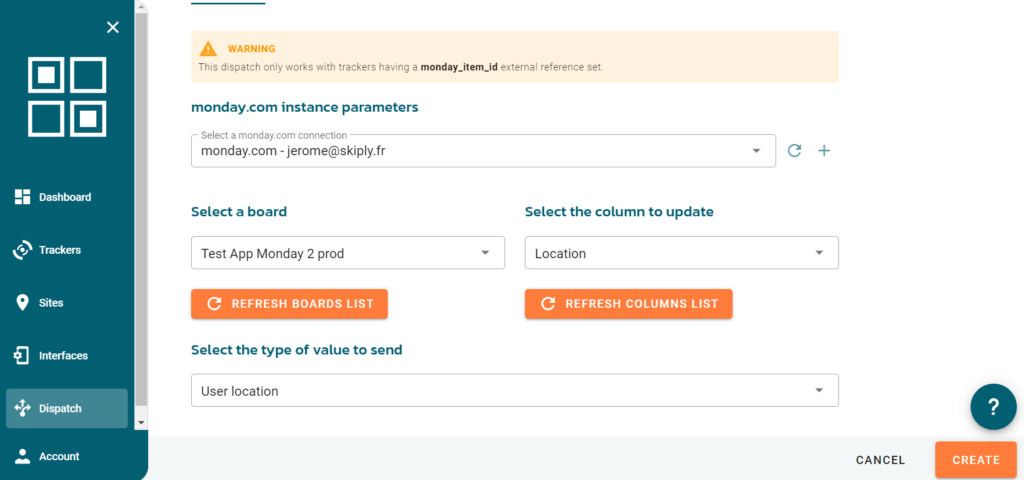
Tip: if you want to update the status of an item instead of the location, you must fill the button label with the exact label of the status.
Create a tracker in Ubiqod (not recommended)
If you prefer creating trackers associated with monday.com items from the Ubiqod interface (or with the Ubiqod API), you need to add an external reference to each monday.com item:
![]()
We recommend using the monday.com QR code tracking App to do it easily with no effort (see next section).
Configure the monday.com QR code tracking App
In order to use the following features, you need to install the App in monday.com.
Click on the button below to install the App (assuming you create a location type column in your board with the label location):
The App includes 2 components:
– An integration (automation) to create and generate a Ubiqod tracker from monday.com and add the tracker link to a column. This link can be use to encode a NFC tag or to generate a QR code
– An item view that will display a QR code from the link created by the integration
Generating a link to the tracker when a new item is added
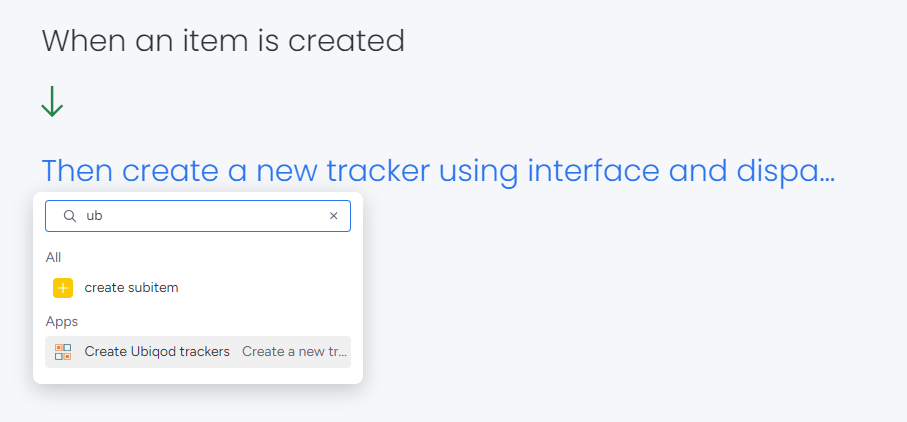
Add an automation to the board (Automation Tab, Add Automation).
You can trigger automatically the creation of a Ubiqod tracker when an item is added, or when you press a button if you have a button column:
The link of the created tracker will be displayed in a link type column in each item of your board (use the item view to see the associated QR code, or use it to encode a NFC tag).
Here is an example of successful configuration:
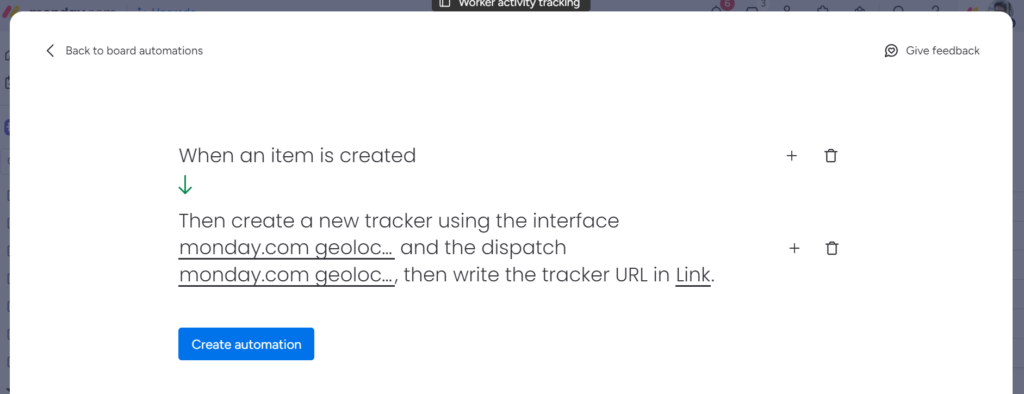
Now, each time that you add an item, the link to the Ubiqod tracker will be provided. You can see it in your Ubiqod interface.
Add item view to display QR code for Ubiqod tracker
Click on a random item label (near the text, not directly on it). This will open the item view menu. Click on Add view:
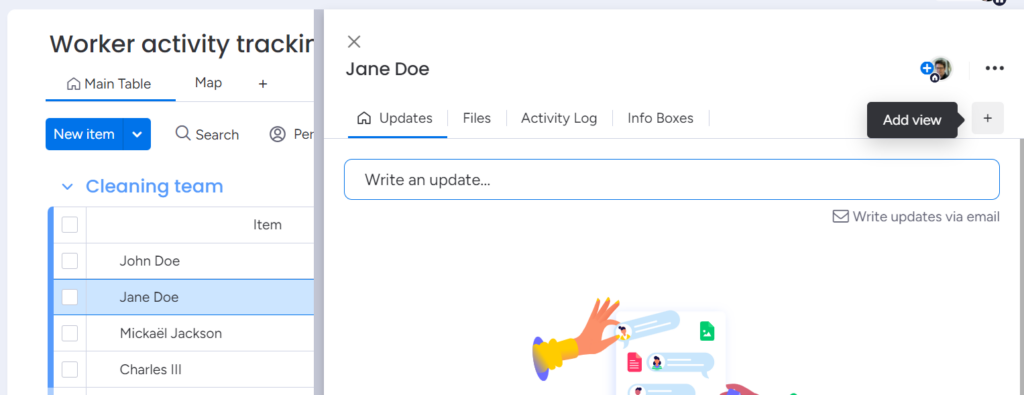
Search for Ubiqod (or look at the bottom of the list in the Installed App section).
Choose “Display item tracking QR code”.
Select the link column containing the tracker url.
Choose the size and the margin of the QR code.
Pricing
The Ubiqod App in monday.com is free.
You must purchase credits to use this app with Ubiqod, as per the Ubiqod price list. If you have questions about pricing, need help estimating your costs, or want a discount for large volumes, please contact our sales team.