


Start typing in the search bar to see suggestions.
Free Employee Tracking App using Google Sheets
In this tutorial, you will learn how to set up a QR code check-in system for staff using the Ubiqod platform and The Free Employee Tracking App “Skiply Timesheet”. If you want to give a quick try, you may start wih the Google Timesheet tutorial.
This tutorial is applicable to standard QR Codes (generated directly by the platform) and Ubiqod Key (sold separately). You can also apply the same process to use the App with wireless RFID reader like Clock S or Smilio A. You can also use the kiosk mode.
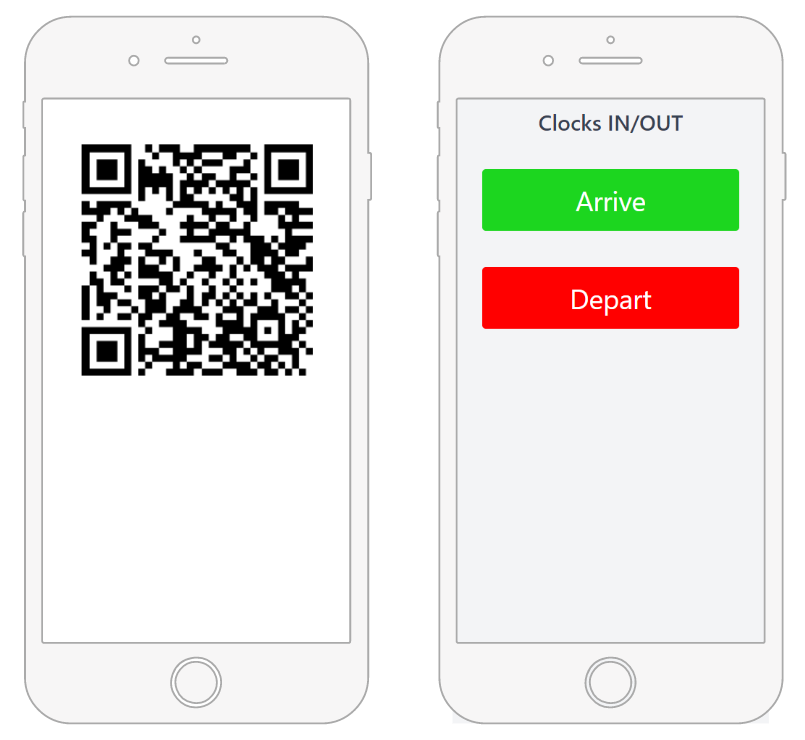
Worker experience for clock in/out
By the end of this tutorial, every worker will have the ability to easily clock in and out using the following method:
He scans the QR code available on site
A screen prompts the user to indicate whether they have arrived or left
The worker enters his personal code or scan his QR code badge to identify himself
You will be able to track the time spent at work on each site in real-time by consulting a Google Spreadsheet
Result: the dynamic timesheet
The timesheets will be automatically processed and formatted into a google timesheet:

Skiply Timesheet offers the following features:
- Automatic filling of arrival and departure times
- Calculation of time spent on each task
- Sorting by site or employee
- Highlighting of clocking anomalies
- Real-time tracking of workers’ presence on site
Before you start: prerequisites
This guide is accessible to anyone already using tools like Google Sheets. However, we recommend that you set aside an hour, in a quiet place, to take the time to follow the different steps.
Before using this application, you need to:
Create a Ubiqod account (you will get 100 free Ubiqoins to test the App)
Have a Google account in order to use Google Sheets service. If you don’t have one, it’s here and it’s free!
Don’t forget to read carefully the applicable limitations.
Configure Google Spreadsheet
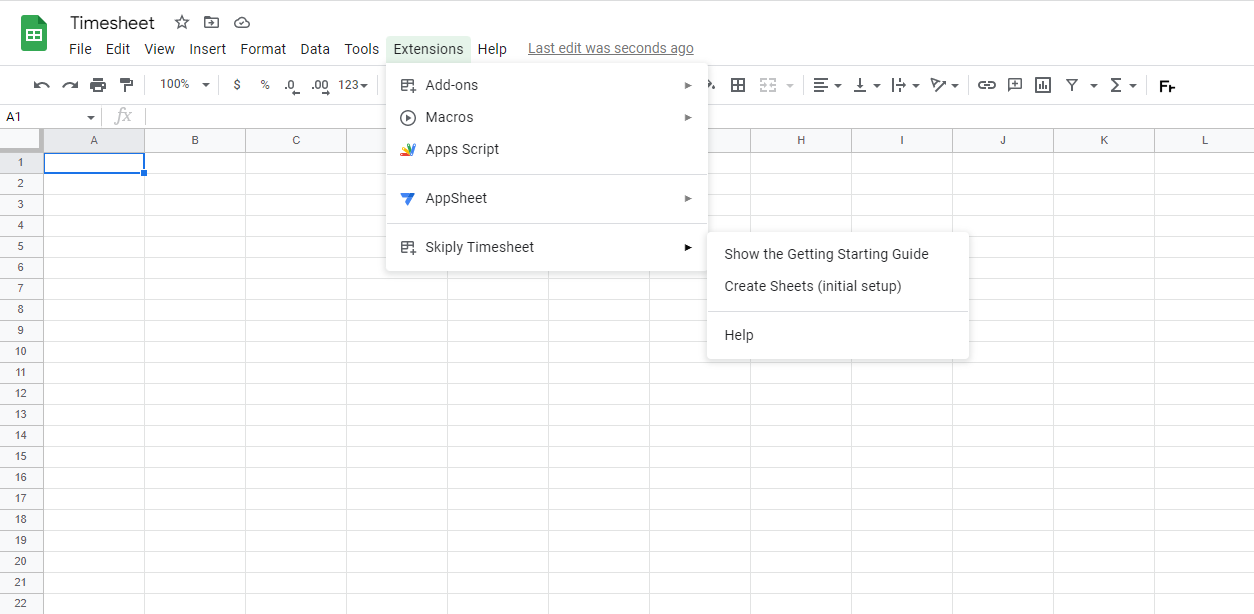
Install the Skiply Timesheet extension
In order top start creating your first free employee tracking App, you need to create a new Google Spreadsheet.
In the menu Extensions > Additional modules, select Download additional modules.
Look for the Skiply Timesheet module, then click on the App.
If your company uses Google Workspace: Select either administrator installation (only for administrators, make the App available for the entire team) or individual installation. If you do not see these options, contact your Google Workspace administrator.
If you are not using Google Workspace: Click on Install.
Click on Continue and validate the required authorizations.
After installation, you should see a new sub-menu named “Skiply Timesheet” in the Extensions menu. If not, wait a few minutes and reload the page.
Check your regional settings
Before launching the App via the menu, it is important check and validate your regional settings, to avoid wrong time format in your timesheet.
In the File > Settings menu, check the time zone and country, then save.
If you change the timezone after configuring the link with Ubiqod, you will have to reconfigure the link so that the new timezone is taken into account.
Initialize the app
In the Extensions menu, go to Skiply Timesheet and select Create Sheets (Initial setup).
When you launch the app for the first time, you have to authorize the app to access the required data.
A dialog box asks you for your date format preferences.
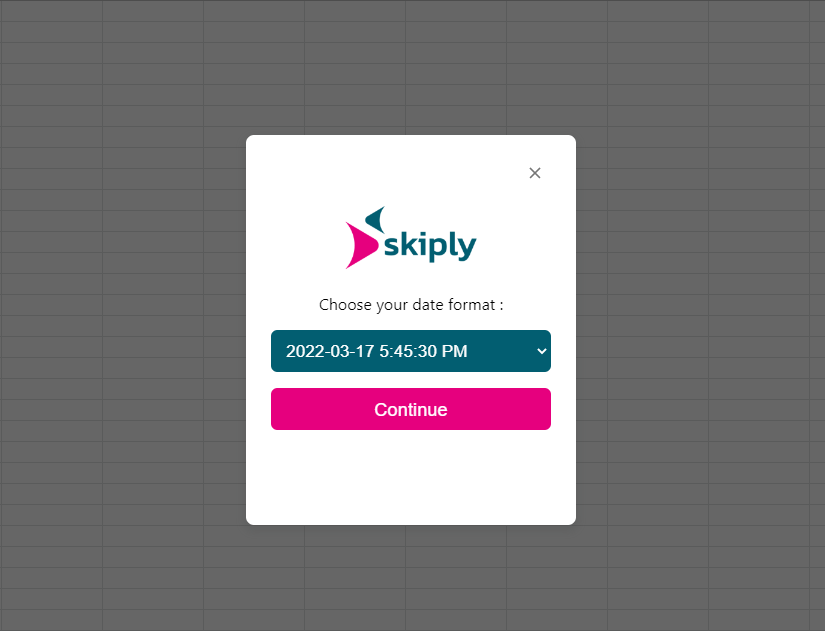
Select your preference and click on Continue.
Wait for the confirmation message at the end of the process before taking any action on your board.
If the screen is blocked at this step (“infinite loading”), this may come from the fact that your are connected to multiple Google accounts at the same time.
To fix it, try one of the following solutions:
Log out of all your Google Accounts and only log in to the one that has the Apps Script project, add-on, or web app you need to access.
Open an incognito window in your browser, and log in to the Google Account that has the Apps Script project, add-on, or web app you need to access.
Your employee tracking App is ready to use! Congratulations!
Now we have to configure Ubiqod to make the link between the QR codes, your sites and the application.
Configure Ubiqod
Login to your Ubiqod account.
Create a Site.
Go to the Sites section.
Create a new site from the CREATE button and give it a name (we will call it “Site A” in this tutorial). Enter its address or GPS coordinates.
Click on CREATE.
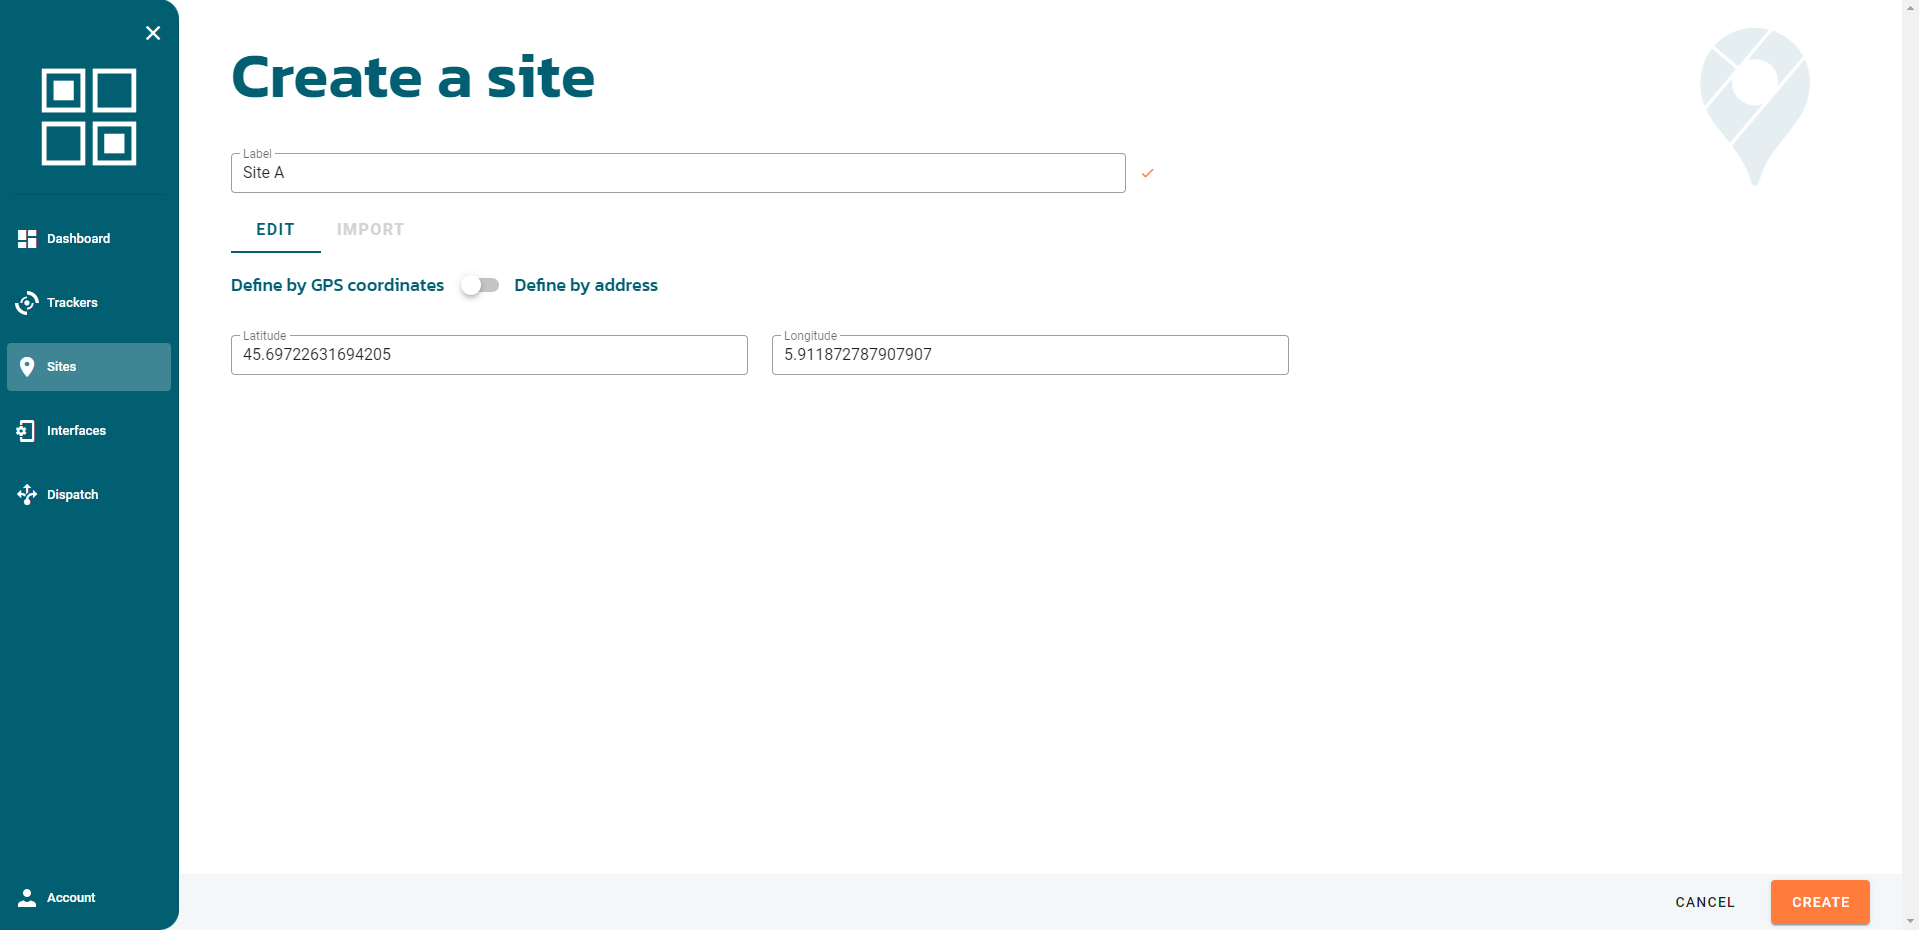
Your site is created.
Create an INTERFACE.
With interface system all you to design the web page that your worker will see after scanning a QR code.
To create your own, go to the Interfaces section.
Click on the CREATE button and select Single Choice:
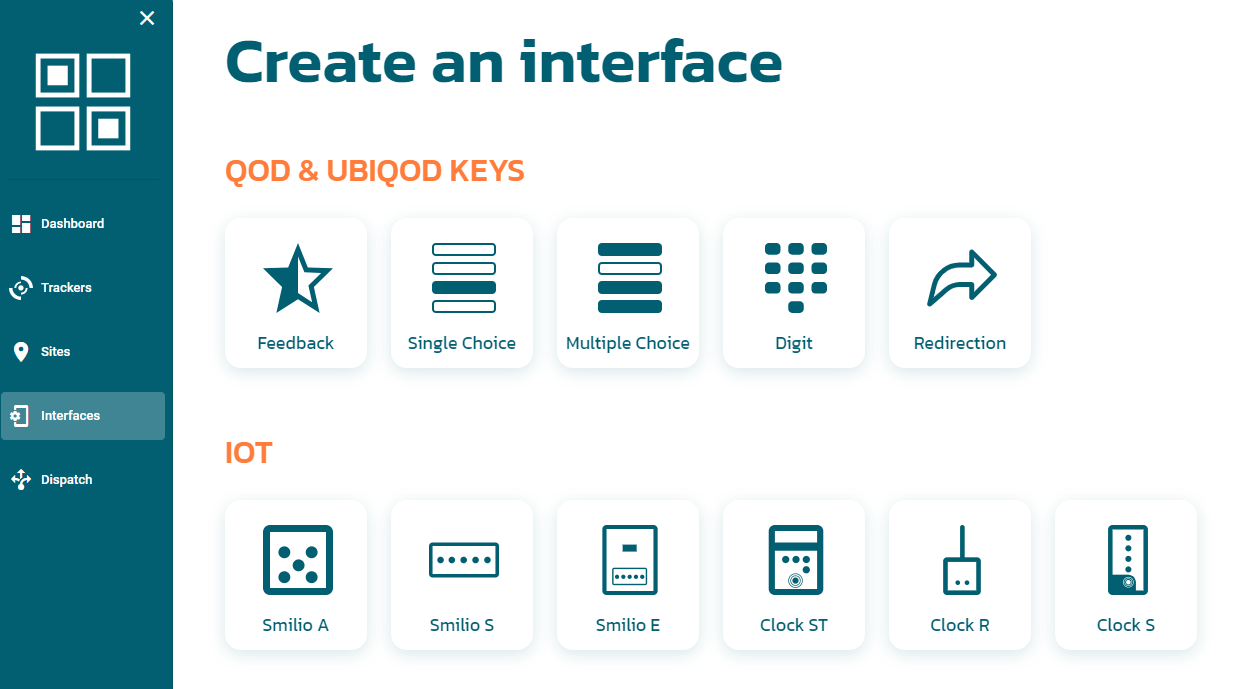
Name the interface (field Label). For this tutorial, we call it “Clocks IN/OUT Interface”.
In the GENERAL OPTIONS tab:
[Optional] Fill in an instruction that your worker will see below the title
[Optional] Enable the display of the tracker name on the web page
[Optional] Enable geofencing: this option will ask for the geolocation of the users and check if he is in the expected area based on the site location
Enable Protect by PIN code
[Optional] Enable Use scan mode if you want to use QR code badges instead of PIN code to identify your worker (this is an advanced feature that required the use of a PIN code list)
[Optional] Activate “Remember the PIN code”. This option stores the employee’s PIN code on his smartphone for X days (in the example below, 7) to make it easier for him to clock in and out. After 7 days, when he wants to clock in, he will have to re-enter his PIN code.
In the EDIT tab, Add 2 buttons:
label: Arrive / reference : 1
label: Depart / reference : 2
If you change the labels Arrive and Depart , it’s imperative to properly update the Settings tab of the Google App (boxes B4 and B5), otherwise the requests will be considered as service requests.
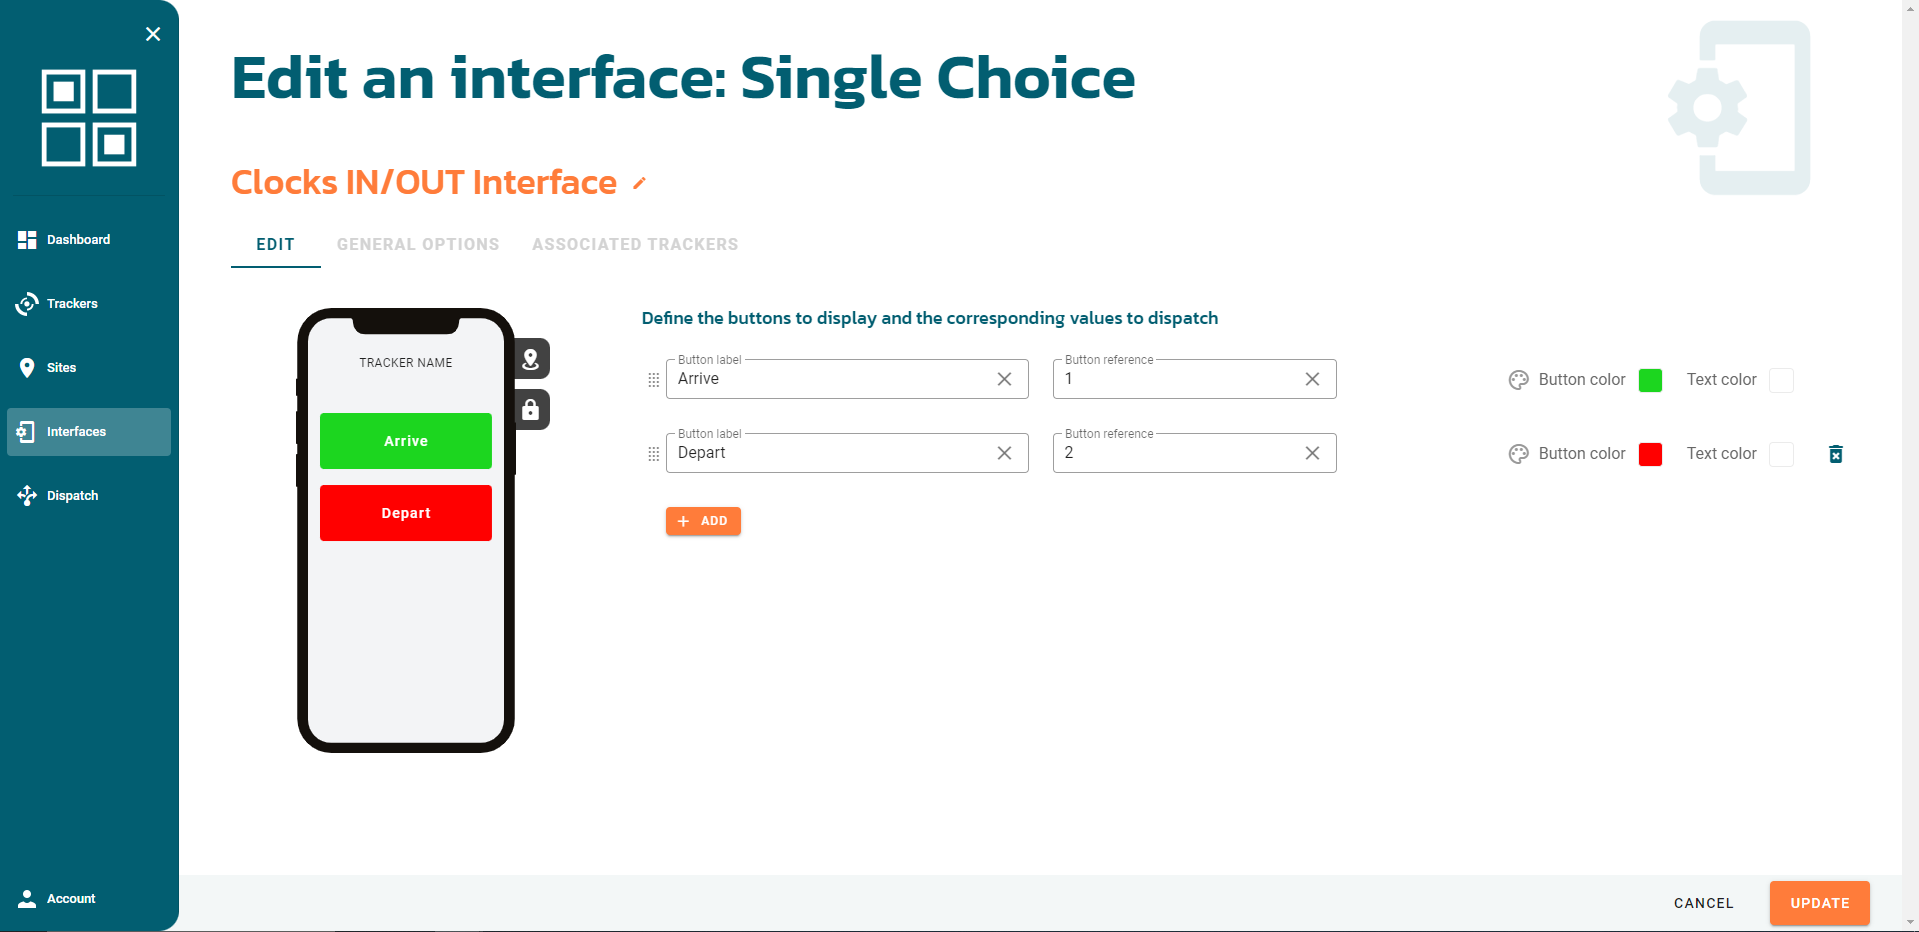
You can also create other custom buttons, such as a customer callback request (Label: Call back customer / Reference: 3).
The clock in/out data will go to the Timesheet tab of the Google Sheets App, and the requests will go to the Service Requests tab.
When everything is setup and ready, click on CREATE.
Create a DISPATCH
The dispatch will tell Ubiqod to send data to the Google Spreadsheet we created in the previous section.
Go to the Dispatch section. and click on the CREATE button.
Create a new Google Sheets dispatch.
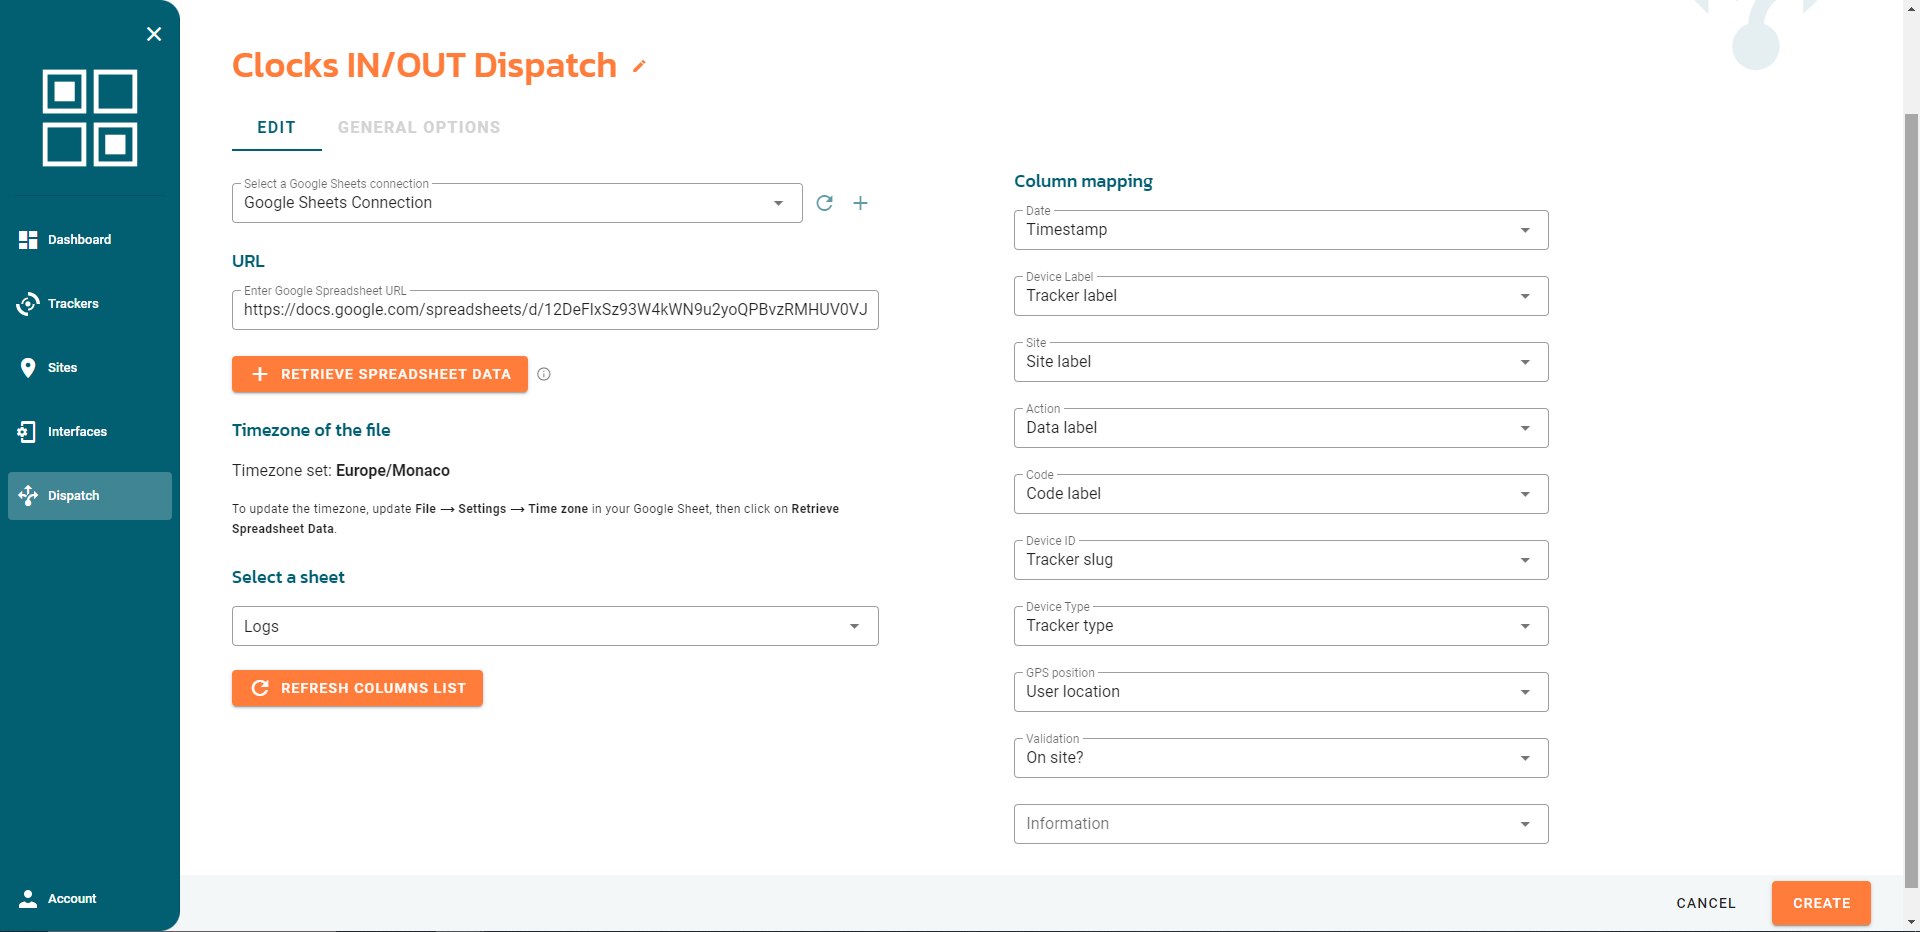
Name the dispatch (field Label). For this tutorial, we call it “Clocks IN/OUT Dispatch”.
If you connect your Google Account for the first time, click on the + sign on the right of the “Select a Google Sheets Connection”.
Give a name to this connection and click on “Sign in with Google”:
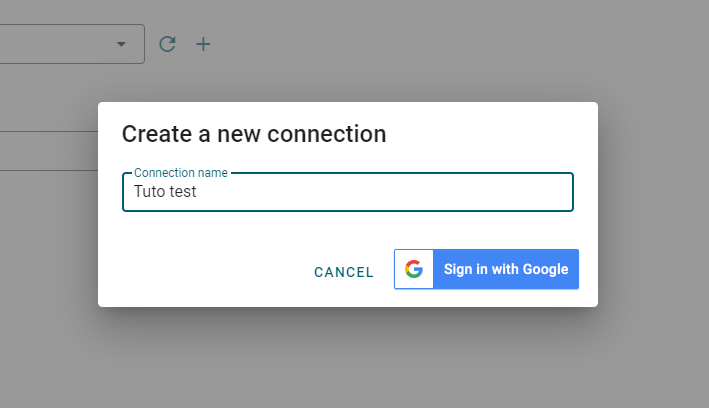
Sign in to your Google Account (if you haven’t already done so) and agree to the terms of use.
Copy the url of the spreadsheet create in the previous section and paste it into the URL field of the dispatch.
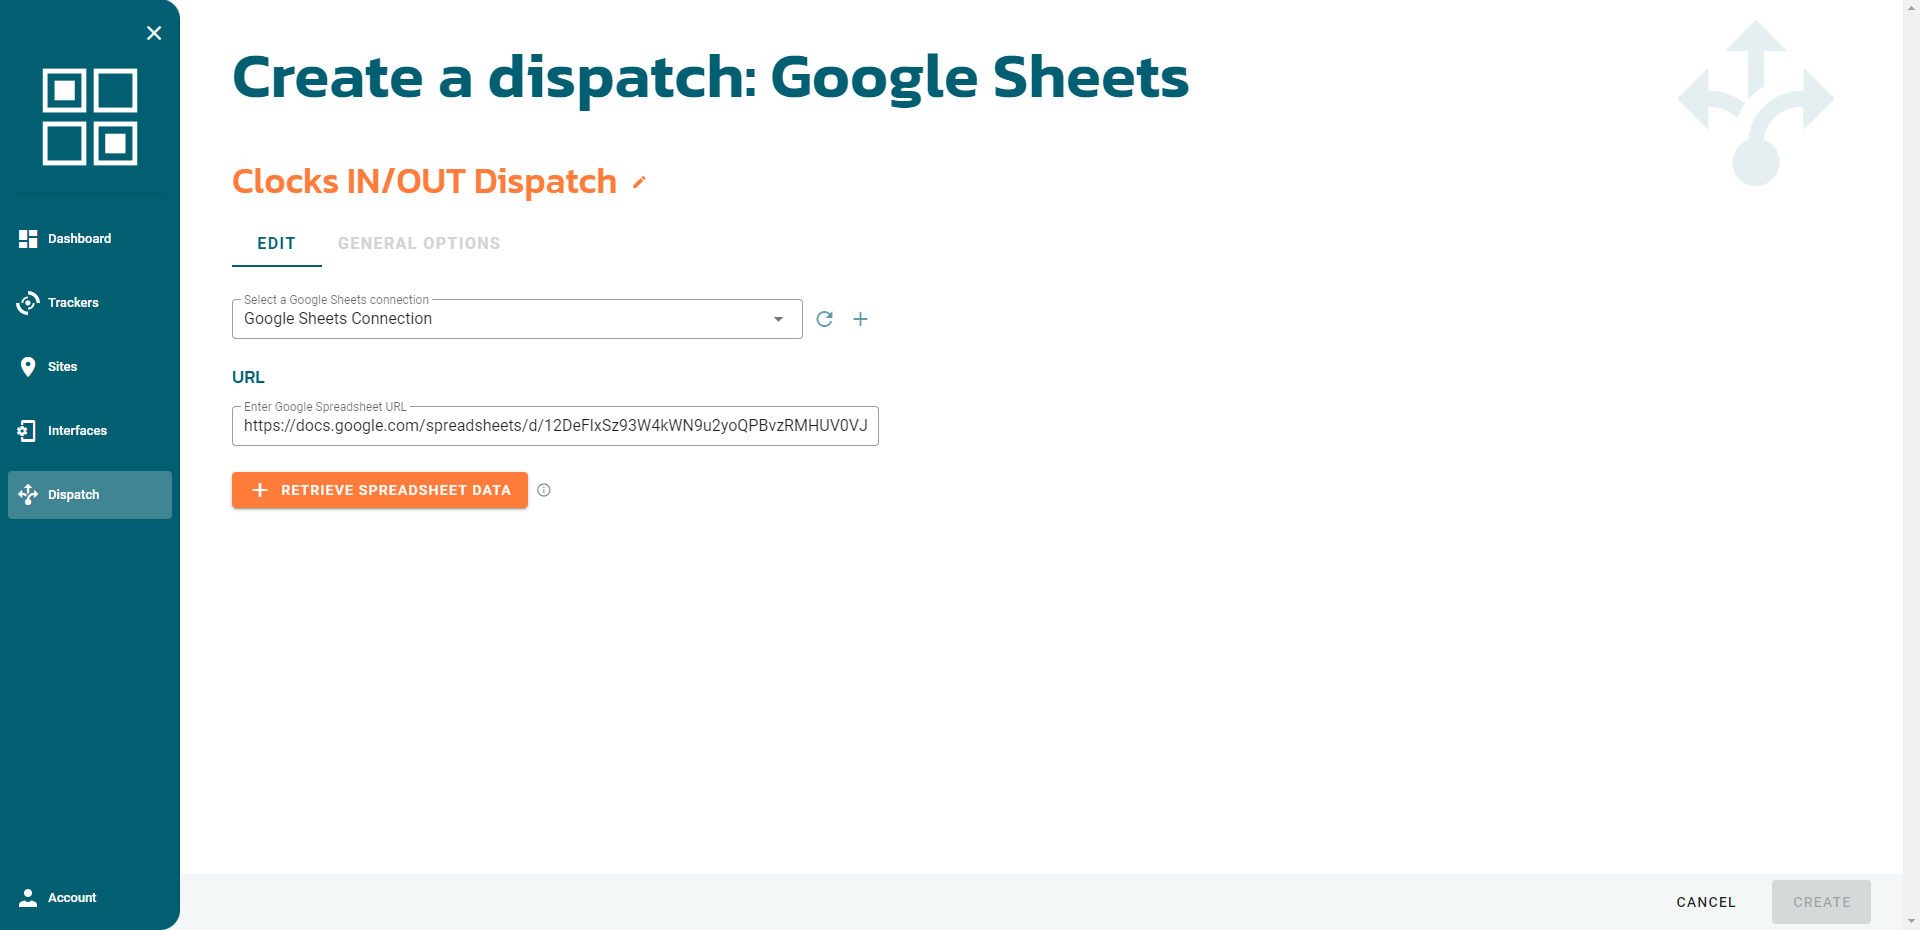
Click on RETRIEVE SPREADSHEET DATA.
Select the Logs sheet and map the columns with the following fields:
Date column: Timestamp
Label of device column: Tracker label
Site column: Site label
Action column: Data label
Code column: Code label
ID of device column: Tracker SLUG
Type of device colum: Tracker type
GPS Location column: User Location
Validation column: On site?
Information column: Leave blank or add the geolocation of the user.
Click on CREATE.
Create your Tracker (standard QR codes)
On the Ubiqod platform, you can create your own standard QR codes and print it afterwards. A standard QR code is called a QOD.
Go to the Trackers section, choose the QOD tab. Click on the + CODE button.
Name the tracker (field Label). For this tutorial, we call it “Timekeeping”.
Now, you can assign:
your “Clocks IN/OUT Interface”
your site “Site A”
your dispatch “Clocks IN/OUT Dispatch”
Click on CREATE.
![]()
Congratulations, your QOD is ready-to-use!
You can jump directly to the Test you new Timesheet App section.
Use an Ubiqod Key
Go to the Trackers section, choose the Ubiqod Key tab. If you don’t see your Ubiqod Key in the list, please follow this tutorial.
Now, you can assign:
your interface “Clocks IN/OUT Interface”
your site “Site A”
your dispatch “Clocks IN/OUT Dispatch”
Click on UPDATE.
![]()
Congratulations, your Ubiqod Key is ready-to-use!
Test Your Employee Tracking App
To ensure that everything is running as expected, scan your QOR or Ubiqod Key and follow the process. Your spreadsheet should update in real time after your submission.
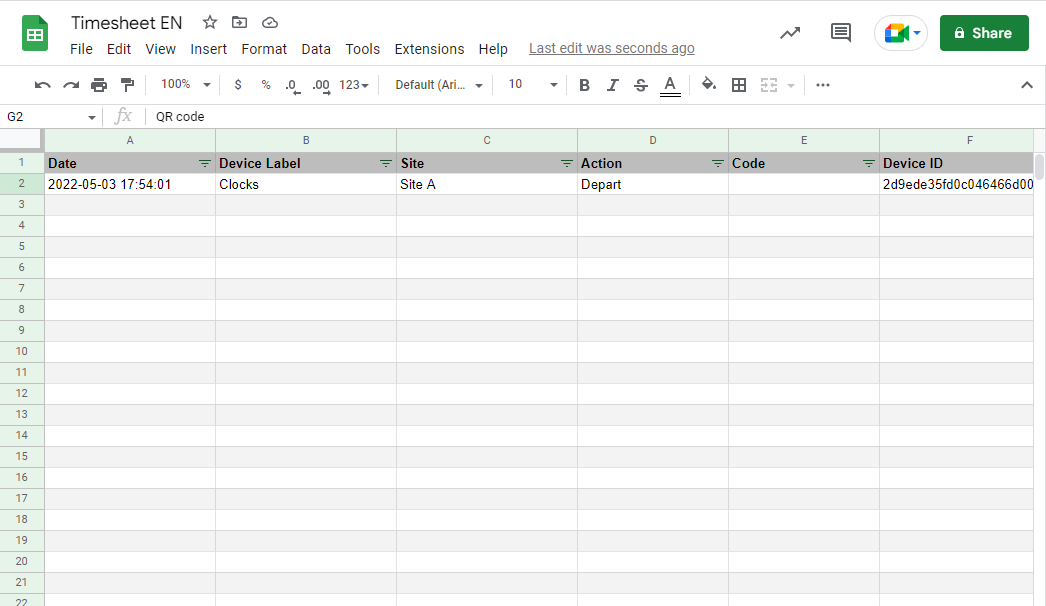
In the “Logs” tab, you should see the “raw” data, that is, unprocessed:
In the “Tracking” tab, you will see the formatted timesheets:

Advice: If you do not see the formatted timesheets in the Tracking tab, make sure you have correctly configured the button labels in the Settings tab.
Next steps: fine tuning
Employee identification
To assign a PIN code to an employee, use the Employee Tab in Google Sheets. This will replace the PIN code with the name of the person. If the code is not found in the list, it will be displayed as a raw value.
Geofencing
When geofencing is enabled, the system will calculate the distance between the user position and the location of the site. If this distance is under the geofencing perimeter indicated in the site page, the column “Validation” in the Logs tab will be updated with the value 1. If the value is 0, this means that geofencing is not enabled, or that the user refused to share his location, or that the user is outside the geofencing area.
Mass printing of QR codes
The Ubiqod platform includes a mass printing function. To print a set of QR codes, select the Qods you want to print, then click on PRINT.
Sharing data
The Skiply Timesheet App benefits from all the features offered by Google Sheets. In particular, it allows you to give read access to a client with the Share button, located at the top right of the interface.
Warranty
The Skiply Timesheet App works as described in this guide as of the date of writing. Its operation depends on the Google platform, with which we have no connection. This application is provided without any guarantee of any kind. Support services are offered by Skiply.
Known limitations of the Employee Tracking App
When a new line is added, Google Sheets performs a calculation to update the timesheet. This calculation can take several seconds to complete. Therefore, if several scores arrive at the same time within a 3-second interval, it is possible that some of them may not be processed immediately. However, they will still be visible in the Logs tab.
If you use the system for many sites, we recommend that you use several tables (e.g. one per customer).