Start typing in the search bar to see suggestions.
Ubiqod Trackers
What is a tracker?
![]()
On the Ubiqod platform, a tracker is a “point of interaction” with a user.
A tracker can be:
A standard QR code, called QOD on the platform
A rotating QR code (Ubiqod Key)
Any device from the Skiply range (RFID clock, Digital Timesheet, connected buttons…)
Each tracker can be associated with :
A site (optional)
An interface
One or several dispatch
Create and configure a tracker
Standard QR codes (QODs)
The platform can generate standard QR codes (QODs) that will be used to interact with users.
To create a QOD, go to the Trackers menu. In the QOD Tab, click on the + QOD button.
Enter the label of your QOD.
Select the associated site (optional), interface and dispatch in the list (you can do it later if you didn’t create them before creating your QOD).
You can select multiple dispatches per tracker.
Click on the CREATE button.
Connected devices (IoT)
To add your Skiply connected device to the platform, please follow this tutorial.
Then, associate your device with a site (optional), an interface and one or multiple dispatch.
Secured QR codes (Ubiqod Key)
To add your Ubiqod Key to the platform, please follow this tutorial.
Then, associate your device with a site (optional), an interface and one or multiple dispatch.
Print QR codes (QODs only)
When you click on a QOD in the tracker list, you can see the corresponding QR code. You can copy or save it directly from your browser with right click.
You can also copy it while clicking on the QR code icon in the QOD list.
When you select multiple QODs from the list and use the Print button, a label sheet ready for printing will be generated in PDF. The label of the QOD will be printed below the QR code, alongside with the Site label if available. Those text can be truncated if they are too long.
Enable and disable a QOD or a Ubiqod Key
In the tracker list, you can activate or disable a device. If a device is disabled, scanning it will return an error to the user.
Activate usage-based billing (pay per scan, QODs only)
In the OPTIONS table, you can choose between the Daily Debt or the Pay Per Scan:
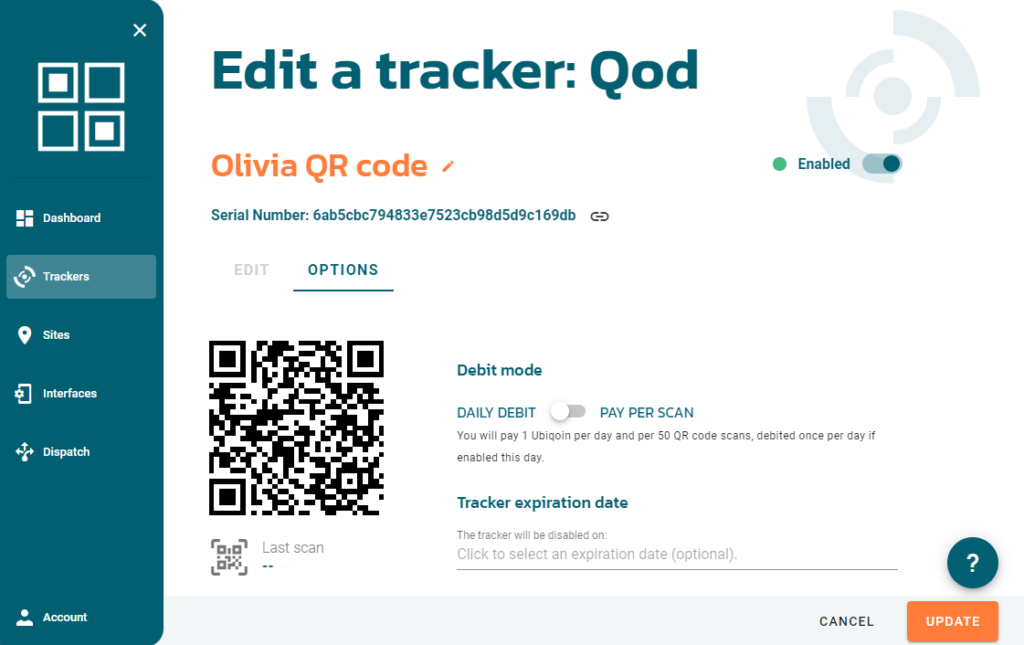
Read how pay per scan works.
Available information
Last scan (QODs and Ubiqod Key)
The last time a user scanned a QR code.
Last interaction (IoT)
The last time a user interacted with a device.
Last transmission (IoT)
The last time that a data packet was received by a device (most of the Skiply devices send daily health information even if no one use them).
Battery level (Ubiqod Key)
The last battery level detected. This level is updated each time a user scan a QR code.
Last commissioning (Ubiqod Key)
Last time that a user launch the commissioning procedure (for instance when replacing batteries).
Available actions
Actions are available on the right side of a tracker line in the list.
Open simulator
Test a tracker without having to scan a QOD or use a real device. Data will be sent to the connectors as if it was a real device or QR code.
Show logs
This allows to check data sent to the connectors and user actions for debugging.
Check network (IoT only)
Check the last radio message quality of a device.
Mass operations
When selecting multiple trackers in the trackers list, you can configure multiple trackers at the same time:
![]()
Available operations
Assign a site
Assign an interface
Assign a dispatch
Enable (QODs and Ubiqod Key only)
Disable (QODs and Ubiqod Key only)
Delete
Print (QODs only)
Export
Duplicate (QODs only)